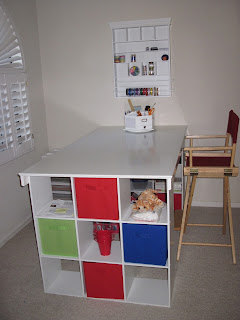
Here is how I turned this cluttered, uninspiring mess:
Into this:
First of all let me give a shout out to my bro Jay who made this possible. I actually stopped scrapbooking a few years ago because all of my stuff was jammed into boxes and crates and to start a project I had to drag what I needed out to the kitchen table and then drag it all back when I was done for the day even if I wasn't done with what I was working on. Talk about uninspiring.
What's cool about Jay's garage is he has so many awesome tools that made putting this table together fun (that's my opinion, may be different if you ask Jay).
A nice sturdy worktable and saw (Hi Jay!):
A biscuit machine....honestly, I had never heard of or seen one before but it makes these slits and you slide the "biscuits" along with a little wood glue to firmly adhere the wood pieces together. If you look closely you can see the little biscuits in the center of the table:
The table was so wide that we had to clamp the clamps to another set of clamps:
And then there was the power nailer! Did I say "power nailer" ???
And one very important ingredient....
Then we must make pretty edges with the router:
With the moulding and router we get this:
And after sanding, 2 coats of primer, 2 coats of paint, 2 coats of lacquer, along with lots more sanding in between, we have the preciousssss:
Now that I have my mess sorted and stored, I realize that.......I need more stuff!!!
Wednesday, December 21, 2011
Black & White Gluten Free Cookies
I found this wonderful and simple recipe here: Elana's Pantry
They are really delicious and you get such a light hint of salt from the shortbread like cookie balanced by the decadent goodness of the dark chocolate. Just takes a couple to be satisfying (where I could literally eat half a bag of those white fudge covered oreo's that come around at Christmas).
The cast of characters:
Here are the baked rounds:
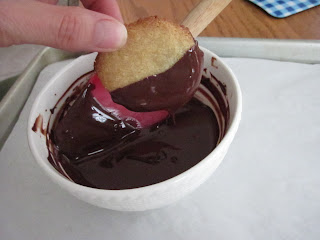
Cooled and dipped in glorious, melted Ghirardelli chocolate:
And set on parchment paper to set:
A couple of notes on the recipe....I put the dough in the freezer per the recipe but my cut outs were not quite firm enough to pick up without tearing so I put the rolled dough in the parchment on a cookie tray and set it in the freezer for about 15 minutes and it was much better. Or you could probably roll into a log and then put the log in the freezer and then slice the circles. I also put the finished cookies in the fridge to harden the chocolate and just kept them in there. They are just as good cold I think. Enjoy!
Black and White Cookies
2 ½ cups blanched almond flour
½ teaspoon celtic sea salt
¼ cup agave nectar
½ cup grapeseed oil
1 tablespoon vanilla extract
1 cup dark chocolate chips
2 ½ cups blanched almond flour
½ teaspoon celtic sea salt
¼ cup agave nectar
½ cup grapeseed oil
1 tablespoon vanilla extract
1 cup dark chocolate chips
- In a large bowl, combine almond flour and salt
- In a smaller bowl, combine grapeseed oil, agave and vanilla
- Stir wet ingredients into dry
- Chill dough in freezer for 30 minutes
- Between 2 pieces of parchment paper, roll out dough 1/4 to 1/8 inch thick
- Using a 2 inch cookie cutter or the top of a 2 inch wide jelly jar, cut out cookies
- Bake at 350° on a parchment lined baking sheet for 5-7 minutes until brown around the edges
- Cool for ½ hour
- In a small saucepan, melt chocolate over very low heat, stirring continuously
- Remove saucepan from heat and one by one, dip cookies into chocolate
- Set cookies to cool on a parchment lined baking sheet --refrigerate if necessary to harden chocolate
- Serve
Makes 24 cookies
Subscribe to:
Comments (Atom)


